Pattern - Love Notions Presto Tunic
Skill Level - Intermediate
Fabric - rayon challis from Fabricland
Skills - topstitching, buttons and buttonholes
Spring is just around the corner, isn't it? Well, we need to work on the spring wardrobe, then. And Love Notions has just the thing - the Presto Tunic! Made from a light woven, Presto has the usual multiple options - 4 sleeve lengths and a choice of mandarin collar or a bias-bound neckline. The loose body has darts at the front and optional shaping darts for the back. And, of course, it has a full bust option for people like me - how I love that full bust option!
The pattern's tutorial is detailed and well-illustrated as we've come to expect and in addition, two video links help you with the trickier aspects - the inset panel and the split hem. Therefore, in this post, I'll concentrate on the topstitching, buttons and buttonholes.
Buttonholes seem to worry quite a number of people, and they really aren't that difficult. If you're in the market for a new sewing machine, make sure you get one that has one-step buttonholes. It's an option that nearly all modern sewing machines have these days.
Before you can do the buttonholes, the panel must be readied. The tutorial instructions will walk you through this. One tip I'd pass along is that when topstitching the placket in the panel, do all your stitching in the same direction. (Click on the pictures to see them in more detail.)
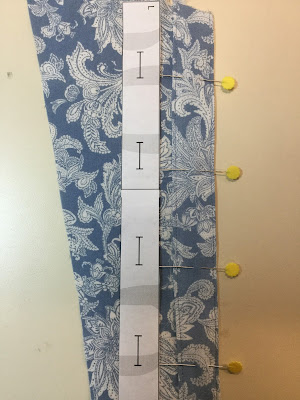
My sewing machine's foot has red dots at the 1/8" mark to help with topstitching. By keeping that dot on the edge I get sharp, even lines. I do my first line of stitching on the side away from the seam with pins holding the placket in place.
Then I topstitch the seam edge. With all stitching going in the same direction, I lessen the chances of distortion with the light fabric I used. Topstitching done, I'm now ready for the buttonholes.
The buttonholes will be on the shirt's right side of the panel, so I place the buttonhole guide next to that placket. If you're in any confusion which side that is, just make your pieces mirror those in the tutorial. I mark the bottom of each buttonhole with a pin as this is where my machine will start. Then I take the placket piece to my sewing machine and stitch the buttonholes. Now we're ready for buttons! And you can do that with your sewing machine, too!
First, I place the two pieces of the panel beside each other so that I know exactly where the buttons will go. I use a glue stick for this step and dab a bit of glue on the back of each button before positioning it on the left panel placket. The glue will be dry by the time I stitch and won't hurt the machine's needle at all. And just a note - I regularly check out my local thrift store for buttons - which is where I bought these ones for a whole 30 cents!
Buttons in place, I'm ready to machine stitch them on. I have a button foot and my machine has a special stitch for that but don't worry if yours doesn't - I tell you how to get around this later. I lower the needle into the first hole (I go diagonally across the holes as these buttons have 4 holes), then when I think I have the button properly placed, I lower the foot.
I always do the first couple of stitches manually to make sure that the button is in the right spot, then let the machine do the rest. I do all of one diagonal side first and trim off all the threads.
Then I flip the piece to do the other diagonal side, trim the threads and I'm done. Takes all of a minute or two!
And once you've had a taste of letting the machine do the work, you'll never go back to hand-sewing buttons again!
Don't have a button foot? Your machine doesn't have a special button stitch? No problem. Take the foot off your sewing machine. Set your machine to zig zag with the shortest stitch length you can - like 0! Adjust the width of the zig zag until it's the right width for your button holes. Turn off the feed dogs. Lower the needle into one of the button's holes and then lower the post of your machine's presser foot onto the button. Hand wheel the first stitch or two. Then zig zag some stitches - about 6 or 8. That's it!
Once the panel is sewn in place - and remember there's a video to help you with this step - it's clear sailing until you get to the hem - and there's a video for that, too!
Warm weather is on the way - treat yourself to a Presto or two. You can get the pattern through my affiliate link below.
Love Notions Presto Tunic


